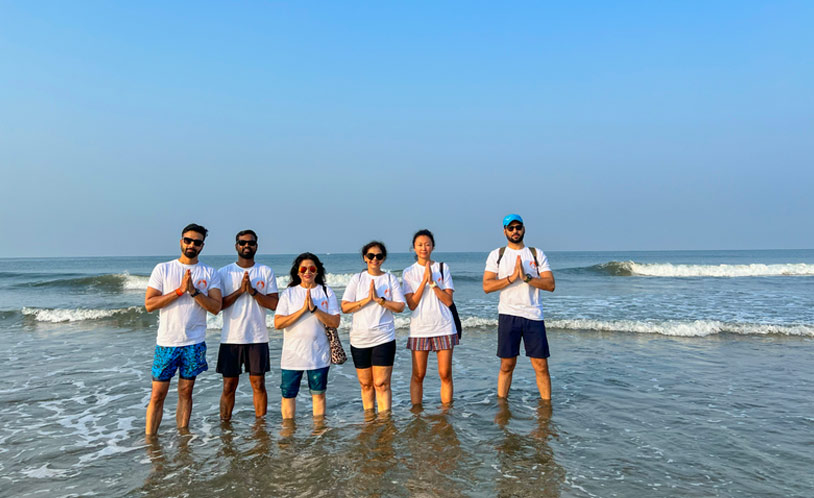
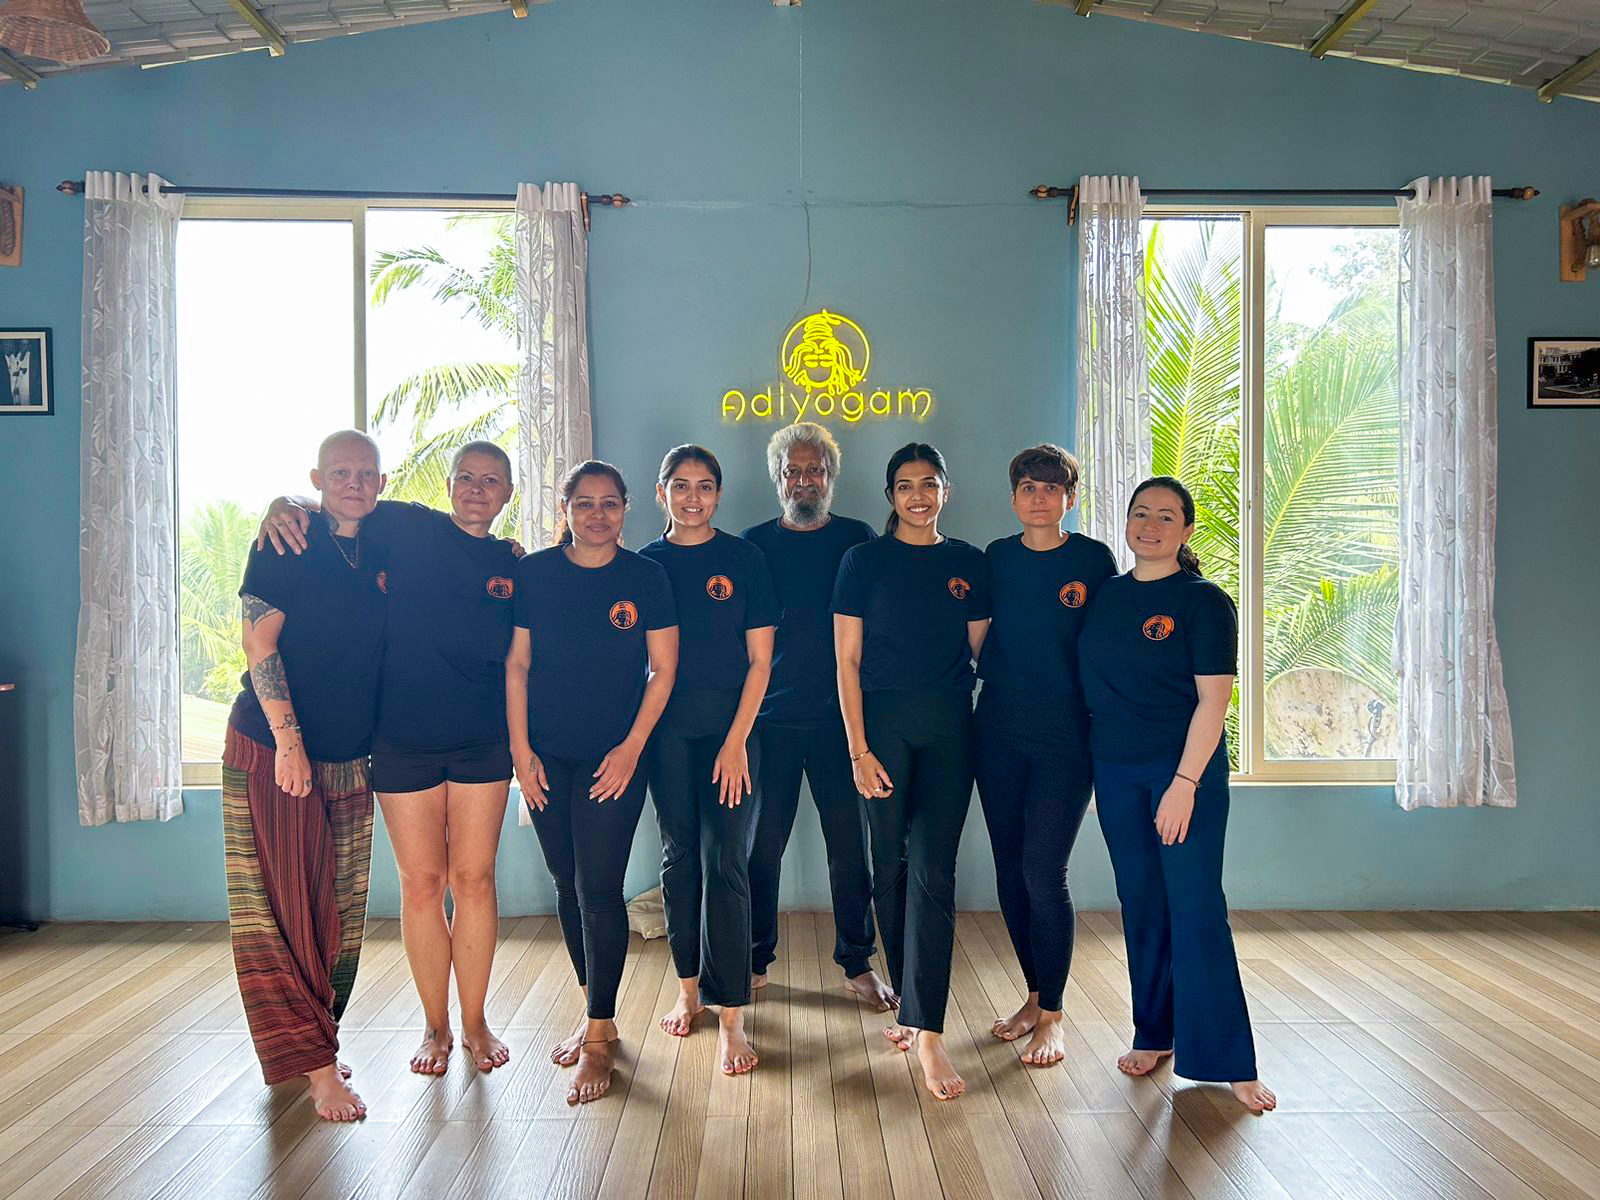
Adiyogam is a multinational organisation that provides yoga teacher training in Goa. Adiyogam’s foundation, serving the wide and expanding world of yoga devotees. Our in-depth curriculum includes topics like Yoga Philosophy, alignment, correction, public speaking guidance, useful hints for preventing injuries, anatomical education, teaching style, and practical teaching practice. establishing yoga ashrams in India’s Goa.
Adiyogam aims to impart the essence of yoga techniques in their most basic form. A committee of the most well-known and successful Yoga Gurus oversees the organisation. Our staff uses a range of languages and explanations to make sure that everyone, including pupils from the western hemisphere and Indian descent, will completely understand the subject matter. In the process of offering yoga teacher training in Goa over the past few years, our yoga gurus have developed a tried-and-true way of improved learning techniques.
Our yoga teacher training in Goa is based on the classic Adiyogam technique, which Sage Patanjali developed more than three thousand years ago. 200-hour training programmes are offered by Adiyogam, a multi-style accredited yoga teacher training facility in Goa. We consistently support our yogis and yoginis throughout the programme so that they have a good mindset and gain confidence with each session. After finishing your studies at Adiyogam, you will be properly trained to teach yoga and will be well-liked in the industry.
Your physical and emotional health may both be harmed by stress. When you are under stress, you may have a number of symptoms, including exhaustion, breathing problems, chest discomfort, high blood pressure, headaches, anxiety attacks, depression, panic attacks, and more. Stress in excess may make us feel ill. We can all agree that a certain level of stress is beneficial for day-to-day living, but when it gets excessive, it becomes unmanageable. In Goa, there are top-notch studios yoga TTC in Goa that may aid in your recovery and stress management.
As you are already aware, stress may have an impact on your mood and overall behaviour in addition to other bodily effects. Through the production of hormones as part of the body’s stress response, stress can reduce the immune system’s reactions, which can lead to a wide range of adverse effects. Stress may permanently alter your mood. Regular exercise is never bad at all, and some people combine it with relaxing pastimes like reading, watching their favourite television show, or going for a walk and taking in the scenery to help them unwind from the stresses of the day.
Yoga promotes both mental and physical serenity. Ashtanga, vinyasa, and power yoga are just a few of the various types of yoga. A wonderful option for managing stress is hatha yoga.
Yoga has a delicate inner working that gets to the core of every issue. Yoga will also improve your physical appearance. Improved balance, flexibility, mobility, and strength may result from yoga practise.
Yoga is useful in certain situations. We provide 200-hour ttc, Hatha yoga sessions, and Yoga teacher training in Goa India. Here, you may learn from experts who will help you succeed in life. Yoga relaxes your body in a variety of ways, whether they be mental, emotional, or physical. By releasing that tension and releasing feel-good chemicals like endorphins, yoga helps to reduce stress and anxiety.
An ardent devotee of Nataraja (Lord Shiva/Pure Being), the origin of yoga and the Master of Dance (Adi Yogi). He believed that everything in the universe was dancing, or always in motion and using energy (vital force).
While he had practised yoga since he was a child, his genuine yoga experience started in 2015. But now that he has earned his master’s in yoga, his perspective and understanding of the practise have completely changed. Yoga is more than simply a physical or breathing exercise; it’s a “work in.” The body and mind are used as tools by yoga to transcend them.
Bharath was going through hell in his social, professional, and even personal lives, yet he never felt depressed. Never approach yoga with a clear, overarching goal; it transcends your aspirations and the material world (yoga deserves credit for this). Improvements will result from sincere yoga practise without expectations, as anybody may see for themselves.
While running yoga retreats, workshops, and programmes for yoga teacher training in Goa, he has been to a few other countries. knowledge of yoga styles such as Ashtanga Vinyasa, Hatha, yoga therapy, etc. a specialist in yoga anatomy, yoga philosophy, advanced pranayama, special tantric meditation methods, and shat karma (six cleansing processes).
Last Words
One very essential thing to remember is that every individual has a distinct body, and everybody is a yoga body with varied capacities. Therefore, think about how your body will respond in various scenarios before attempting a specific posture. Yoga is about engaging yourself, not about pushing yourself into every position.
The first standing yoga pose name comes from the Sanskrit, utkata, meaning “intense” or “powerful,” and asana, meaning “posture.” The common English name for utkatasana is chair pose. It is also sometimes called as fierce or powerful pose.
Steps with breathing:
Stand erect in taadasana keep the feet together.
With a deep breath in, lift the arms above the head. The arms can either be kept facing each other with palms joined or they can be kept parallel to each other.
Exhale; bend from your waist 30 degree forward. With further exhalation bend your knees, push your hip back as if you are sitting on a chair and gaze in front.
Maintain the pose from 30 seconds to 1 minute. With inhalation, release the pose by straightening the knees. With further inhalation bring the arms to the sides of the body and stand in shithala taadasana.
Adjustments:
Biceps close to ears.
Knees should not cross over your toes.
Inner thighs parallel to each other.
Draw the tail bone and belly in.
Benefits:
1. The muscles of the thighs, knees, calves and ankles get toned. 2. Strengthens the muscles of torso and the lower back. 3. Reduces symptoms of Flat feet. 4. Stimulates the heart, diaphragm and abdominal muscles.
Contra Indications:
This asana should not be performed if one suffers from chronic knee pain, arthritis, sprained ankles, damaged ligaments, headache or insomnia.
Variations:
1. Interlace the fingers and after coming in the chair pose, lift the heels off the floor. 2. Parivrtta Utkatasana (Revolved Chair Pose).
2.Padahastasana (Standing forward fold)
Second standing Yoga pose in sanskrit pada means feet, hasta means hand and asana means pose. Since this asana is demonstrated by touching the feet with hands it is known as pada hasatasana and in English it is called hands to feet pose.
Steps with breathing:
Feet together, stand straight with hands by your side and shoulders rolled back.
Inhale; raise the hands over the head with palms facing each other.
Now turn the palms forward, with exhalation, slowly draw the belly in and bend the body from the waist line and bend downwards bringing the hands beneath the feet or beside the feet.
Keep the legs straight and knees soften.
Keep the forehead between the knees.
Hold the pose for 30 seconds to 1 minute.
With inhalation look up release the palms and with further inhalation, raise up the hands and as you exhale bring hands down and relax in shithala taadasana.
Adjustments:
Practice with your arms straight over your head and palms facing forward out in front.
Bend from your waist line and try not to hunch your back.
Shift your weight towards the ball of your feet to keep your knees safe. If feeling unsteady you can slightly bend your knees.
It’s important to bring your palms beneath the feet or beside the feet if not able to place them then you can place it on the ankles or shin bone.
Keep the forehead between the knees and try to keep your knees straight.
Practice with your feet together but if you’re feeling unsteady, try stepping your feet hip-width apart.
Variations:
Keeping the palms beside the feet.
Catch hold of big toes (padangustasna.)
Catch hold of calf muscles or ankles.
Benefits:
Eliminates the excess fat around the abdomen and thighs.
Purifies and strengthens the sushumna nadi.
Prevents constipation and relieves stomach ache.
Massages the entire abdominal organs and tones the liver, spleen and the kidney.
Contraindications:
Forward bending is strictly prohibited for people with severe lower back problems, high blood pressure, any heart diseases and hernia.
Third standing yoga pose name comes from the Sanskrit words prasarita meaning stretched out, pada meaning foot, uttana meaning intense stretch and asana meaning posture. Prasarita padottanasana is commonly referred to as wide-legged forward bend in English.
Steps with breathing:
Stand in taadasana
Step or slightly stretch your legs apart 4-5 feet.
Hands on waist, lengthen your spine and press the outer edges of your feet and ball of the big toes firmly into the floor. Inhale; lift your chest, making the front torso slightly longer.
As you Exhale, maintaining the length of the torso, lean the torso forward from the hip joints.
Once the torso becomes parallel to the mat bring your hands in line with the shoulders on the floor and keep the torso lengthened.
Inhale and raise the head up creating a concave curve in the spine
Exhale and walk your fingertips between your feet, bend the elbows and lower your torso and head into a full forward bend. Or rest the crown of the head on the floor.
Stay in this pose for 30 seconds to 1 minute in normal breath.
Inhale, raise the head from the floor and straighten the elbows. Keeping the torso straight exhale and stand as in position 2.
Slowly bring the legs together and relax in shithala taadasana.
Adjustments:
After widening the feet, both the toes should be pointing forward.
Make sure your inner feet are parallel to each other.
While bending forward lean from waist not from upper back.
While inhaling try to make the back concave.
Once the torso is parallel, place the palms in line with the shoulder.
In the final posture, elbows are bent and pressing the palms on the floor between the feet.
Variations:
Elbows on the ground.
Catch hold of the big toes.
Interlacing the fingers behind the back.
Benefits:
Reduces excess fat in the legs, upper back and waist region.
Intense stretches for the hamstrings and abductor muscles.
It tones the abdominal organs.
Mooladhara, Swadhistana, Manipura Chakras are enhanced.
Contraindications:
People with acute back pain, high blood pressure, vertigo and cervical spondylosis should avoid this pose.
4. Yoga pose Parswa konasana(Side angle pose)
Fourth standing Yoga pose in Sanskrit, Parswa means side, Kona is an angle and asana means posture. In English it is called as Extended lateral angle pose.
Steps with breathing:
Stand in taadasana hands on the waist. Inhale feet apart by 3/4 feet or as much comfortable, point the right foot towards right side.
While firming the left heel on the floor exhale and bend your right knee until right thigh is parallel to the floor and make sure knee doesn’t cross the toes.
With inhalation bring the arms parallel to the floor, palms facing downward and gaze at the right middle finger.
While lengthening the entire left side of your body with further exhalation bring the right torso on right thigh and place right hand’s finger tips beside the right foot touching the floor and stretch the left arm over the head and gaze at the left hand’s finger tips.
Remain in this position from half a minute to a minute, breathing deeply and evenly. Inhale and extend the arms parallel to the floor, straighten the knee and exhale back in shithala taadasana.
Adjustments:
Front knee should not cross the toes and make the 90 degree angle.
Thigh should be parallel to the floor.
Front heel should be in line with heel behind or it can be in line with the centre of the behind foot.
Weight of the body should be evenly distributed on both the legs.
Variations:
1. Placing the elbow on the bent knee in case the extended hand’s palm is not reaching the ground. 2. Placing the extended hand’s palm in front of the bended leg’s foot and extend the other hand towards the ceiling.
Benefits:
Relieves the stiffness in the back and shoulders.
Strengthens and tones up the ankles, knees and thighs.
Reduces the fat around the waist and relieves the sciatica and arthritis pain.
It also increases peristaltic activity and aids elimination.
Contraindications:
This asana is strictly prohibited for people with injury of knees, hips, spine, shoulders and ankles, High/ low blood pressure, Diarrhoea
5. Yoga pose Virabhadrasana Dwe (Warrior B)
Fifth standing yoga pose Sanskrit Vira means warrior, bhadra means ferocious or fearsome and asana means pose. According to Hindu mythology lord Shiva created the ferocious warrior named Veerbhadra and set him out to destroy evil powers. In English it is called as the Warrior pose.
Steps with Breathing:
Stand in taadasana, feet together and hands on the waist.
Take a deep inhalation and with a jump spread the legs apart sideways 4 to 4 half feet.
Turn the right foot right side and keeping the left heel firmly on the ground and leg stretched out completely.
With inhalation, raise the arms in line with the shoulder, palms facing down.
Exhale and bend the right knee tilt the right thigh parallel to the floor, right knee perpendicular to the floor, thus forming a right angle between the right thigh and right calf and gaze at the right middle finger.
Stay in the pose from 30 seconds to 1 minute with deep breathing. Inhale and come up. Turn the left foot and continue on the left side.
After completing on both the sides relax in shithala taadasana.
Adjustments:
Front knee should not cross the toes and make the 90 degree angle.
Thigh should be parallel to the floor.
Arms should be in line with the shoulders, away from the ears.
Core should be engaged.
Front heel should be in line with heel behind or it can be in line with the centre of the behind foot.
Weight of the body should be evenly distributed on both the legs.
Variations:
Bend the legs first and then extend the arms.
Extend the arms first and then bend the knees.
Only bending of the legs, with hands on the waist. ( in case of pain in hands and shoulders)
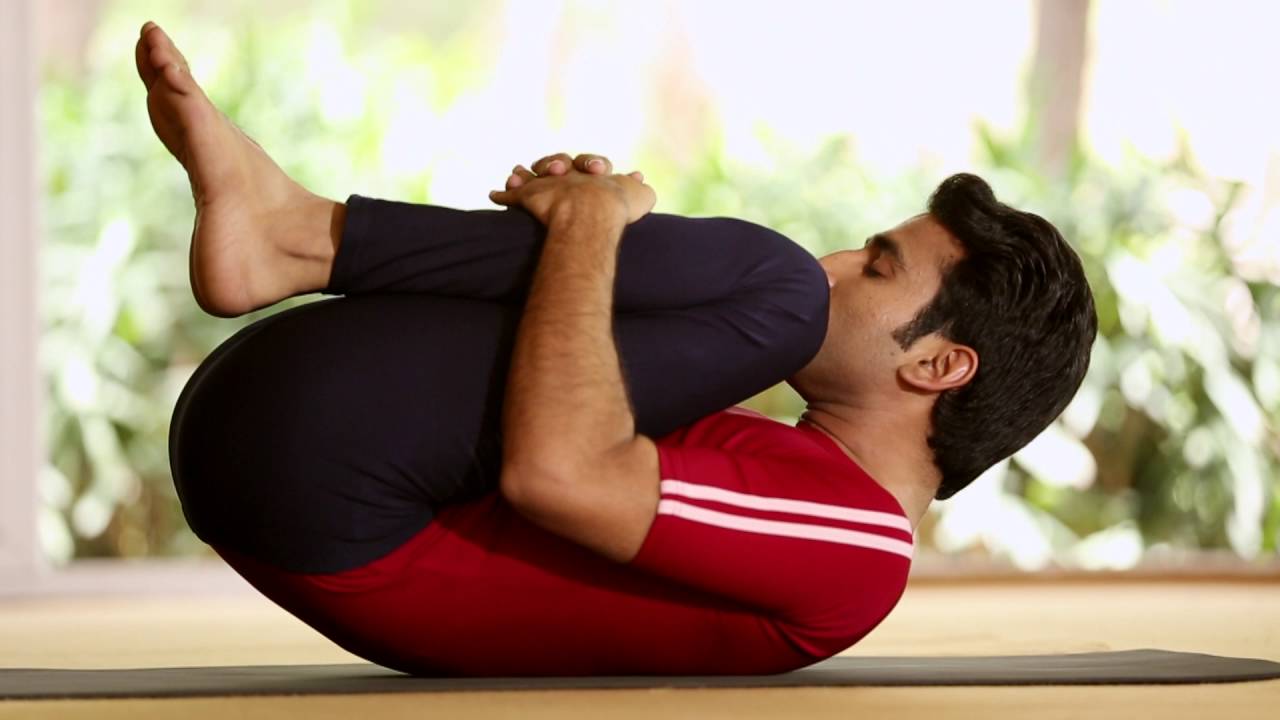
Pavanamuktasana (Wind relieving pose) Pavanamuktasana comes from the Sanskrit, “Pavana mukta ” meaning “Wind relieving”,and “Asana”, meaning “Posture”.
Steps with breathing
1. Lie flat on the back with legs together and straight. The arms should be by the sides, palms facing down, head, neck and spine should be in a straight line.
2. Inhale deeply, bend both the knees and bring the thighs closer to the chest. Interlock the fingers and clasp the hands on the shin bones just below the knees. While exhaling, raise the head and shoulder and try to place the chin in the space between the two knees. Maintain the asana from 30 seconds to a minute.
3. Slowly lower the head, shoulders and legs and rest in shavasana.
Adjustments
1. You can either interlock your fingers or hold the elbows of the opposite arm.
2. Try to keep your lower back well grounded on the floor.
3. As you exhale, tighten the grip of the hands on the knee and increase the pressure on the chest.
4. It is important to start with the right leg because it presses the ascending colon directly. follow with the left leg which presses the descending colon directly.
Variations
1. Eka Pada (single leg) Pavanamuktasana.
2. Pawanamuktasana without raising the head.
Benefits
1. Strengthens the lower back muscles.
2. It massages the abdomen and digestive organs and is therefore very effective in removing wind and constipation.
3. It strengthens the reproductive organs and also useful for impotence, sterility and menstrual problems.
Contraindications
1. Not to be performed by the people suffering from high blood pressure.
2. Serious back conditions such as sciatica and slipped disc.
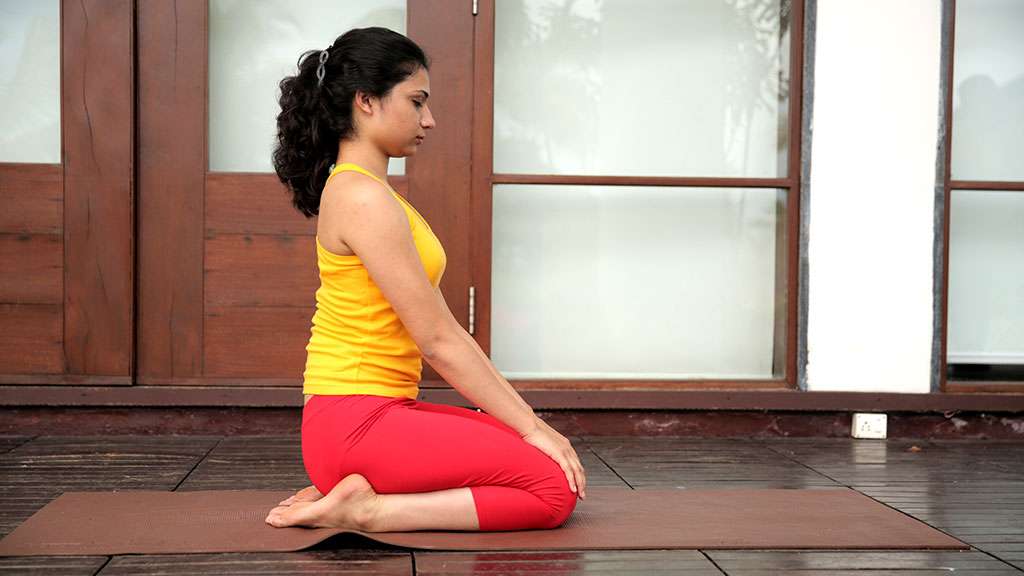
The Vajrasana name comes from the Sanskrit, “Vajra ” meaning “Diamond”, and “Asana”, meaning “Posture”.
Vajrasana or thunderbolt is said to be the weapon of lord Indra, king of the devas or gods, just as the mind is the king of all the senses. Vajrasana is also the major nadi directly connected with the genitourinary system, which regulates the sexual energy in the body. Control of vajra nadi leads to sublimation and control of sexual energy.
Steps with breathing
1. Sit in dandasana and slowly bend your knees one by one and keep it beneath the buttocks, toes pointing out behind.
2. Sit on the heels with the calves beneath the thighs.
3. Sit straight with spine, neck and head in one line and palms on the knees facing downwards.
4. Stay in normal breath for about 30 seconds to 1minute, slowly can increase the duration. Slowly extend the legs one by one and relax back in shithala dandasana.
Adjustments
1. Big toes touching each other.
2. Four finger gap between the kneecaps.
3. Head, neck and spine should be erected and shoulders rolled back.
Variations
1. Spread both the heels out on the side and place buttocks between on the ground.
2. Knees wider and toes together.
3. Being in vajrasana lieing down on back which is called as Supta vajrasana.
4. Those have knee pain in this posture can put pillow or bolster under the buttocks.
Benefits
1. Vajrasana alters the flow of blood and nervous impulses in the pelvic region and strengthens the pelvic muscles.
2. It is a preventative measure against hernia and helps to relieve piles.
3. It reduces the blood flow to the genitals and the nerve fibres which feed them, making it useful in dilated veins of the testicles and hydrocele in men.
4. It alleviates menstrual disorders.
5. It increases the efficiency of the entire digestive system, relieving stomach ailments such as hyperacidity and peptic ulcer.
Contraindications
1. Do not practice vajrasana until the ankles and knees are sufficiently flexible.
Breathing is a vital process that starts at the time of birth and ends at the time of death. Many people consider pranayama to be a physical practice of breath control, but this not so. The main effects of pranayama manifest in the nervous system and in pranamaya kosha (subtle psychic body) and the control of breath is only the means of manipulating these finer processes. The breath is known as ‘Thread of life’ and depending on its actions the entire life process is refined, balanced, or else thrown out of proper order.
Siva Samhita Says:
There is a brilliant lotus in the heart decorated with twelve petals with brilliant signs. It is ornamented with twelve letters ka to tha.
There lives PRANA, decorated with various desires, together with its past karma, which has no beginning, and it is infused with its egoism.
Due to various modificationsprana has various names. PRANA, APANA, SAMANA, UDANA, VYANA, NAGA, KURMA, KRKARA, DEVADATTA, DHANANJAYA.
Out of these 10 first five are main ones. Among these five prana and apana are super most important.
What is Pranayama?
The word Pranayama is a combination of two words; ‘prana’ and ‘ayama’. Prana again combination of two syllables, pra and na. Prana denotes constancy; it is a force in constant motion. Pranayama is not merely breath control, but a technique through which the quality of prana in the body is activated to a higher frequency.
In yogic terminology, it is said that whatever is manifest is the sthula Roopa (gross form) of the subtle, cosmic energy, known as prana. In yoga and tantra there is an eternal truth: the basis of existence depends on two forces, Shiva and Shakti, or consciousness and energy. Ultimately they are not two forces but one; Shakti or prana is the creative force of consciousness or Shiva.
tasmin sati śvāsa-praśvāsyor-gati-vicchedaḥ prāṇāyāmaḥ ॥49॥
Regulation of breath or the control of Prana is the stoppage of inhalation and exhalation, which follows after securing that steadiness of posture or seat, Asana. Thus is Pranayama defined in Patanjali Yoga Sutras, Chapter II-49. In simple words, sage Patanjali says pranayama as the gap between inhalation and exhalation.
Others offer Prana (outgoing breath) in Apana (incoming breath) and Apana in Prana, restraining the passage of Prana and Apana, absorbed in Pranayama. Pranayama is a precious Yajna (sacrifice). Some practice the kind of Pranayama called Puraka (filling in). Some practice the kind of Pranayama called Rechaka (emptying). Some are engaged in the practice of Pranayama called Kumbhaka, by impeding the outward passage of air, through the nostrils and the mouth, and by impeding the inward passage of the air, in the opposite direction.
(According To Sri Sankaracharya)
“Pranayama is the control of all life-forces by realizing naught but Brahman in all things as the mind,” etc.
“The negation of the Universe is the outgoing breath. The thought: ‘I am Brahman’ itself is called the incoming breath. The permanence of that thought thereafter is the restrained breath. This is the Pranayama of the wise, while the pressing of the nose is only for the unknowing.” (Aparokshanubhuti, 118-120).
Pranayama is regarded lengthy or subtle according to its three components, the external, the internal and the steady; the retention processes are modified by the regulations of space, time and number.
Just as a goldsmith removes the impurities of gold by heating it in the hot furnace, by strongly blowing the blowpipe, so also the Yogic student removes the impurities of the body and the Indriyas by blowing his lungs, i.e., by practicing Pranayama.
The chief aim of Pranayama is to unite the Prana with the Apana and take the united Pranapana slowly towards the head. The effect or fruit of Pranayama is Udghata or awakening of the sleeping Kundalini.
Science of Pranayama:
The air drawn in to the lungs by the action of diaphragm. When it expands, the sides of the chest and lungs in increased and the outside air rushes in to the vacuum thus created. The chest and lungs contract, when diaphragm relaxes and the air are expelled from the lungs.
Yogic Science:
There are two nerve currents one on either side of the spinal column; Ida and Pingala. One controls left nostrils and another right nostril, one is cooling and other is heating, one controls right hemisphere of brain and other left hemisphere of brain. Breath flows through left nostril for 1 hour and then through right nostril for one hour. When the prana flows through Sushumna, the serpent power or sleeping Sakti, situated at the back of the anus, which is attached to spinal column. Sadhaka becomes dead to the gross world and enters Samadhi.
What is Prana?
“He who knows Prana knows Vedas” is the important declaration of the Srutis. You will find in Vedanta Sutras: “For the same reason, breath is Brahman.” Prana is the sum total of all energy that is manifest in the universe.
In Upanishads, Prana vayu is also called the “in breath” apana the “out breath”, Samana the “middle breath”, and Udana the “up breath”. Prana vayu is inhalation, apana exhalation, Samana the time between inhalation and exhalation, and Udana, the extension of Samana.
According to Maitri Upanishad:
Samana is the higher form of Vyana and between them is the production of Udana. That which brings up or carries down what has been drunk or eaten is Udana.”
Naga, Kurma, Krikara, Devadatta and Dhananjaya are the five sub-Prana.
When the whole system of nadis, which is full of impurities, is cleaned, then the Yogi becomes able to control the Prana.
If our perception were finely attuned to the pranic body, we would see a light body in which there were thousands of fine, wire like structures are the nadis. Nadi is channel or flow of energy (prana). Nadis are astral tubes made up of astral matter that carry Pranic currents. The astral eyes can see them only. They are not the nerves. The Goraksha satarka says there are 72,000 nadis in number. Ida, Pingala and Sushumna are the important ones. Sushumna is the most important of all.
Ida and Pingala
There are the two nerve-currents one on either side of the spinal column. The left one is called Ida and the right is known as Pingala. These are Nadis. Tentatively, some take these as the right and the left sympathetic cords, but they are subtle tubes that carry Prana. The Moon moves in the Ida and the Sun in the Pingala. Ida is cooling. Pingala is heating. Ida flows through the left nostril and the Pingala through the right nostril. The breath flows through the right nostril for one hour and then through the left nostril for one hour. Man is busily engaged in worldly activities, when the breath flows through Ida and Pingala. When Sushumna operates, he becomes dead to the world, and enters into Samadhi. A Yogi tries his level best to make the Prana run in the Sushumna Nadi, which is known as the central Brahman Nadi also. On the left of Sushumna is situated Ida and on the right is Pingala. The moon is of the nature of Tamas and the sun is that of the Rajas. The poison share is of the sun and the nectar is of the moon. Ida and Pingala indicate time. Sushumna is the consumer of time.
Sushumna
Sushumna is the most important of all the Nadis. It is the sustainer of the universe and the path of the universe and the path of salvation. Situated at the back of the anus, it is attached to the spinal column and extends to the Brahmarandhra of the head and is invisible and subtle. The real work of a Yogi begins when Sushumna begins to function. Sushumna runs along the Centre of the spinal cord or spinal column. Above the genital organs and below the navel is the Kanda, of the shape of a bird’s egg. There arise from it all the Nadis 72,000 in number. Of these, seventy-two are common and generally known. Of those the chief ones are ten and they carry the Prana. Ida, Pingala, Sushumna, Gandhari, Hastijihva, Pusa, Yusasvini, Alambusa, Kuhuh and Sankhini are said to be the ten important Nadis. The Yogis should have knowledge of the Nadis and the Chakras. Ida, Pingala and Sushumna are said to carry Prana and have Moon, Sun and Agni as their Devatas. When Prana moves in Sushumna, sit for meditation. You will have deep Dhyana. If the coiled-up energy, Kundalini, passes up along the Sushumna Nadi and is taken up from Chakra to Chakra the Yogi gets different sorts of experiences, powers and Ananda.
Kundalini
Kundalini is the serpent power or sleeping Shakti, that has 3 1/2 coils with face downwards, in the Muladhara Chakra, at the base of the spine. No Samadhi is possible without its being awakened. The practice of Kumbhaka in Pranayama produces heat and thereby Kundalini is awakened and passes upwards along the Sushumna Nadi. The Yogic practitioner experiences various visions. Then the Kundalini passes along the Six Chakras and eventually gets united with Lord Siva, seated on the Sahasrara or thousand-petalled lotus, at the crown of the head. Nirvikalpa Samadhi ensues now and the Yogi gets liberation and all the divine Aishvaryas. One should practice control of breath with a concentration of mind. The awakened Kundalini that is taken up to Manipura Chakra may drop down again to Muladhara. It has to be raised again with effort. One should become perfectly desireless and should be full of Vairagya before he attempts to awaken Kundalini.
Kundalini is like a thread and is resplendent. When it is awakened it hisses like a serpent beaten with a stick and enters the hole of Sushumna. When it travels from Chakra to Chakra, layer after layer of the mind becomes open and the Yogi acquires various Siddhis (psychic powers).
Most widely popularized Pranayama techniques along with detailed instructions, benefits and contraindications.
Essentials before commencing practice of PRANAYAMA:
One should find right place and time.
Eat in moderation.
Purification of Nadis.
Purification of Nadis:Two types:
Samanu(performed with Bija mantra like OM) and Nirmanu (without bija mantra)
(Nirmanu):
PracticeNadishuddhi (detailed explanation in Nadishuddi technique) techniques 20 times with Kumbhaka for 4 times in a day; Early morning, middle of the day (noon), at sunset, at mid night. When nadis are purified impurities are destroyed. Then practitioner enters ARAMBHA (state of beginning) Avastha. (4 states Arambha, Ghata:state of realization of the self, Parichaya:state of knowledge, Nispatti: state of liberation.)
Signs of Purified NADI’S:
Body harmonized.
Emitting a nice scent appearing beautiful.
Voice becomes melodious, sweet and lovely.
Strong digestive power.
Enjoyment of all things.
Enthusiasm.
Great courage and strength.
A wise yogi should not practice pranayama right after eating or when he is hungry. During the practice first, he should take some milk and butter.
Signs of perfection in Pranayama Practice:
The body perspires
Trembles in second
Starts jumping like a frog in third.
When the greater practice is continued after that practitioner becomes Gaganacara (TRAVELER IN THE AIR)
Pranayama and meditation should performed using these main sitting postures:
The Utkatasana or Chair pose is a pose which helps in strengthening the legs and the abdominal region.
The name comes from the Sanskrit, “utkata” meaning “intense” or “powerful,” and asana, meaning “posture.” The common English name for utkatasana is chair pose. It is also sometimes called as fierce or powerful pose.
Table of Contents
Chair Pose (Utkatasana) Steps with breathing
Adjustments Chair Pose (Utkatasana)
Benefits of Chair Pose (Utkatasana)
Contra Indications to Chair Pose (Utkatasana)
Variations of Chair Pose (Utkatasana)
Chair Pose (Utkatasana) Steps with breathing
Stand erect in “taadasana” keep the feet together.
With a deep breath in, lift the arms above the head. The arms can either be kept facing each other with palms joined or they can be kept parallel to each other.
Exhale; bend from your waist 30 degree forward. With further exhalation bend your knees, push your hip back as if you are sitting on a chair and gaze in front.
Maintain the pose from 30 seconds to 1 minute. With inhalation, release the pose by straightening the knees. With further inhalation bring the arms to the sides of the body and stand in shithila taadasana.
Adjustments Chair Pose (Utkatasana)
Biceps close to ears.
Knees should not cross over your toes.
Inner thighs parallel to each other.
Draw the tail bone and belly in.
Benefits of Chair Pose (Utkatasana)
The muscles of the thighs, knees, calves and ankles get toned.
Strengthens the muscles of torso and the lower back.
Reduces symptoms of Flat feet.
Stimulates the heart, diaphragm and abdominal muscles.
Contra Indications to Chair Pose (Utkatasana)
This asana should not be performed if one suffers from chronic knee pain, arthritis, sprained ankles, damaged ligaments, headache or insomnia.
Variations of Chair Pose (Utkatasana)
Interlace the fingers and after coming in the chair pose, lift the heels off the floor.
If you are struggling with abdominal and thigh fat, then Standing forward fold – Padahastasana is the yoga pose which you need to try at least 10 minutes daily.
Before, starting the asana we need to understand the proper way of doing the particular asana.
At the end of this write up we have given the video for the practical demonstration.
What is the meaning of Padahastasana?
In sanskrit pada means feet, hasta means hand and asana means pose. Since this asana is demonstrated by touching the feet with hands it is known as pada hasatasana and in English it is called hands to feet pose.
Steps with breathing:
Feet together, stand straight with hands by your side and shoulders rolled back.
Inhale; raise the hands over the head with palms facing each other.
Now turn the palms forward, with exhalation, slowly draw the belly in and bend the body from the waist line and bend downwards bringing the hands beneath the feet or beside the feet.
Keep the legs straight and knees soften.
Keep the forehead between the knees.
Hold the pose for 30 seconds to 1 minute.
With inhalation look up release the palms and with further inhalation, raise up the hands and as you exhale bring hands down and relax in shithala taadasana.
Adjustments:
Practice with your arms straight over your head and palms facing forward out in front.
Bend from your waist line and try not to hunch your back.
Shift your weight towards the ball of your feet to keep your knees safe. If feeling unsteady you can slightly bend your knees.
It’s important to bring your palms beneath the feet or beside the feet if not able to place them then you can place it on the ankles or shin bone.
Keep the forehead between the knees and try to keep your knees straight.
Practice with your feet together but if you’re feeling unsteady, try stepping your feet hip-width apart.
Variations:
Keeping the palms beside the feet.
Catch hold of big toes (padangustasna.)
Catch hold of calf muscles or ankles.
Benefits:
Eliminates the excess fat around the abdomen and thighs.
Purifies and strengthens the sushumna nadi.
Prevents constipation and relieves stomach ache.
Massages the entire abdominal organs and tones the liver, spleen and the kidney.
Contraindications:
Forward bending is strictly prohibited for people with severe lower back problems, high blood pressure, any heart diseases and hernia.
Prasarita Padottanasana (Wide-Legged Forward Bend) is the asana, which not only increases the blood circulation in your abdominal, thighs and hamstring region but also rejuvenates Mooladhara, Swadhistana, Manipura Chakras.
What is the meaning of Prasarita Padottanasana?
The pose name comes from the Sanskrit words “prasarita” meaning stretched out, “pada” meaning foot, “uttana” meaning intense stretch and asana meaning posture. Prasarita padottanasana is commonly referred to as wide-legged forward bend in English.
Steps with breathing:
Stand in taadasana
Step or slightly stretch your legs apart 4-5 feet.
Hands on waist, lengthen your spine and press the outer edges of your feet and ball of the big toes firmly into the floor. Inhale; lift your chest, making the front torso slightly longer.
As you Exhale, maintaining the length of the torso, lean the torso forward from the hip joints.
Once the torso becomes parallel to the mat bring your hands in line with the shoulders on the floor and keep the torso lengthened.
Inhale and raise the head up creating a concave curve in the spine
Exhale and walk your fingertips between your feet, bend the elbows and lower your torso and head into a full forward bend. Or rest the crown of the head on the floor.
Stay in this pose for 30 seconds to 1 minute in normal breath.
Inhale, raise the head from the floor and straighten the elbows. Keeping the torso straight exhale and stand as in position 2.
Slowly bring the legs together and relax in shithila tadasana.
Adjustments: After widening the feet, both the toes should be pointing forward. Make sure your inner feet are parallel to each other. While bending forward lean from waist not from upper back. While inhaling try to make the back concave. Once the torso is parallel, place the palms in line with the shoulder. In the final posture, elbows are bent and pressing the palms on the floor between the feet.
Variations:
Elbows on the ground.
Catch hold of the big toes.
Interlacing the fingers behind the back.
Benefits:
Reduces excess fat in the legs, upper back and waist region.
Intense stretches for the hamstrings and abductor muscles.
It tones the abdominal organs.
Mooladhara, Swadhistana, Manipura Chakras are enhanced.
Contraindications:
People with acute back pain, high blood pressure, vertigo and cervical spondylosis should avoid this pose.